Depth of Field - What it is and how it works
- Greg
- Jan 16, 2024
- 13 min read
Updated: Mar 4
Most people in online forums seem to have a one-track idea of how DoF works in photography. A common and notorious view is, that you need an as shallow as possible DoF for portraiture and wildlife, to get a nice out of focus background, and the famous "cinematic look".
Or if you are a landscape photographer you are in constant search of getting the deepest possible DoF so your image is sharp from closest foreground element to the most distant mountains using hyperfocal distance, focus stacking and any method to achieve this.
The internet is full of articles and videos about having to buy the most expensive fast lens to get a shallow DoF, or having to stack 100 images to get an endless one. And yet the most common question you will find in comment sections and forums is something along the lines of "Where do I have to focus?" and "Why isn't the foreground in my image sharp when I zoom in?"
Don't get me wrong, there is plenty of good information out there, but the really helpful stuff gets drowned in a cacophony of half truths, and opinions. One of those being, that a crop sensor camera cannot get you a shallow DoF for wildlife - or any type of - photography. You need the most expensive full frame camera and a 400mm f/2.8 lens, a combo that will easily set you back 20,000USD or more.

The Eurasian blue tit depicted is a very small bird with a total body length of just 12 cm (4.7 in), but due to the shallow DoF the tail feathers are already out of focus. The whole DoF is around 1 in or 2.5 cm
A colleague of mine, doing camera body testing (ISO and resolution) for a publication, saw some of my songbird images, like the one above.
Knowing that I am a Nikon Z system user, and own a Z9 he assumed right away, that the images must have been taken with the then brand new Nikon Z 400mm f/2.8 VR S TC lens costing an eye watering 14,000USD. There was, in his opinion, no other way to get such a shallow DoF. He was surprised, when I told him what gear was used to take this picture (foreshadowing).
What is depth of field and how does it really work then?
As many on the internet will tell you there are 3 things that will affect your DoF:
Focal length (of your lens x camera crop factor)
Focus distance (or subject distance)
Aperture
What most forget to tell you is that these three do not have the same amount of effect on DoF, and that there is a relation between them, just like with the three of the exposure triangle. (shutter speed - aperture - ISO)
But the most important part not being said enough is:
Depth of field -aka the acceptably sharp area of the image- should always be calculated for a certain viewing (printing) size, viewing distance, and with visual acuity also taken into account
Literature and calculator apps will refer to this as "CoC - Circle of Confusion".
Without going too deep into the technical (and boring) stuff, a specular highlight will only be a dot on the plane of focus, and will become a bigger and bigger circle (bokeh ball) the farther away it is from the focal plane (either in front or behind). DoF will always only be the "acceptably sharp area", not pin sharp, and will depend on how closely, and how big you look at it.

Bokeh balls! YAY!
Most calculators will use a simplified CoC calculation based on Camera sensor, or image format. Instead you should use one like Photopills' "Advanced DoF" Calculator, that will allow you to tweak the above mentioned print dimension, viewing distance and visual acuity giving you a much more precise calculation for what will be acceptably sharp.

But this then also means that you have to be very strict with your framing, and have to plan ahead for the biggest print size (display size) you will ever want that image to be displayed on.
Cropping in post - effectively changing the focal length -, displaying bigger than the original calculation will show the blur in places where the smaller size hid it. Choose your viewing dimensions wisely, the difference will be huge for the hyperfocal distance, and the DoF near limit, which could cause your foreground to end up looking not sharp when printed large. So from now on when we talk about DoF, we always mean "for a certain display size, and viewing distance with 20/20 vision". You can make this your DoF mantra, if you like.
With that crucial information out of the way, let's take a look at how you will use the three things affecting your DoF in your photography, and whether you need 20.000USD worth of gear to take a photo of a songbird with a smooth background.
The DoF "triangle"
Focal length, focus distance and aperture have a unique relationship with each other.
The basics of it are:
Focal length: zooming in will create a shallower Dof, zooming out will create a deeper DoF, if the other two do not change
Focus distance (or subject distance): getting closer gets you a shallower DoF, moving further away from your subject gets you a deeper DoF, again if nothing else changes
Aperture: opening up the aperture (smaller f number) gets you shallower DoF, closing down (bigger f number) makes it deeper, if nothing else changes
You can set the first two in a way, that aperture will have very little effect on the amount of DoF compared to the subject size, you can also change focal length and focus distance in a way that aperture will be the only thing affecting the DoF.
Types of photography where the latter would happen are event, wedding, and portrait photography, where the size of your subject, and what you want to have in your frame will define your focal length and the distance to your subject. Better said: a change in focal length will force you to change the distance accordingly, if you want to keep your framing the same.
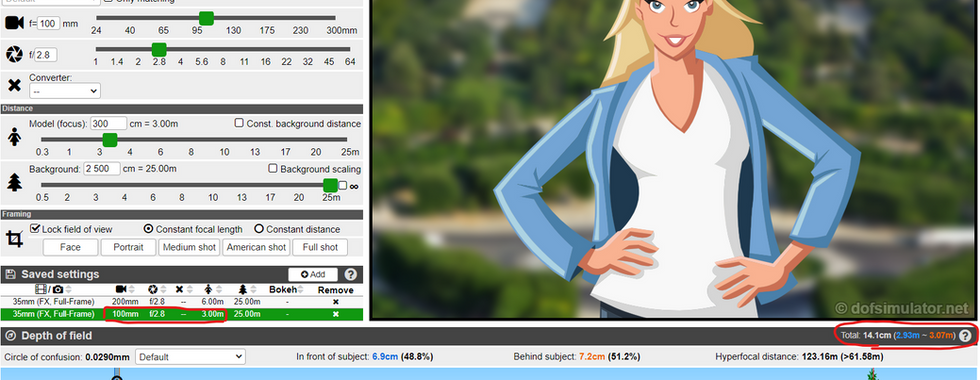
For example: if you are shooting a "medium shot" of your human sized subject at 100mm focal length, you will have a distance to your subject of 3 meters. If you then zoom in on your 70-200 f/2.8 lens to 200mm, to get the same frame (subject size) in your image you will have to also double your distance to 6 meters. The Dof will be 14.1 cm (5.6 in) in both cases, and the only thing changing your DoF will be aperture.
But you will also see a significant change in background rendering due to the famous "telephoto compression". At 200mm you have a smaller angle of view, you "zoom" into the background and it will appear smoother than at 100mm, although your DoF is the same.
My favorite tool to showcase this is the website https://dofsimulator.net/en/ created by Michael Bemowski, who kindly permitted to use his site. You can scroll between the two images (below), with the total DoF shown in the right side of the bottom grey bar, and the settings shown with the sliders. I urge you to play around with this great tool to get a feel of how DoF is defined by your settings. To test 100mm focal length vs 200mm, you just choose your frame and then click the "Lock field of view" box. Any changes you make to either the focal length, or focus distance will cause the other to change accordingly. Tweaking the CoC is also possible in his tool to get a more accurate hyperfocal distance, this time with print size, and megapixel count.


Click the gallery to open in a pop-up to see the whole picture
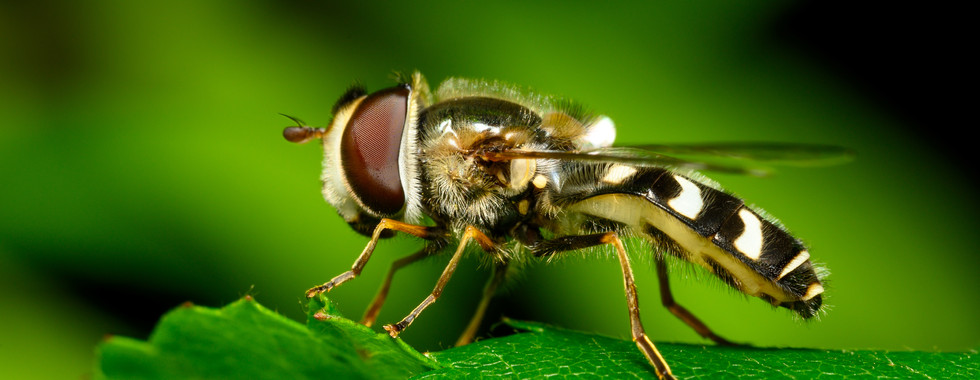
The first case mentioned at the beginning of the paragraph (aperture making a very small difference in DoF) would be in macro photography. Photographing an insect with a 1:1 magnification ratio 100mm lens means being at minimum focus distance, and a DoF of just 0.27 mm (0,0106 in) at an aperture of f/2.8. Changing the aperture to the smallest f/22 will only make the DoF become 3.05 mm (0,12 in) on a frame filling subject, that is 24 mm (almost 1 in) long. While loosing 7 stops of light, and diffraction causing a lot of image quality loss. Even at the smallest aperture you will have to do a lot of stacking to get all of it sharp. The below image taken head on of a bug is the focus stack of 2 separate images, each for one eye to be in focus. Looking at the ground at its front legs will show how shallow the DoF is, even though it is a stack of 2 images. The image of the hoverfly is taken at an aperture of f/13, and still the wing tips are blurred.


For many types of photography like portraiture, wedding, wildlife, macro, close up food, focal length and focus distance will have a much larger effect on DoF, than aperture. Filling your frame with a small subject will set the DoF range by default to be shallow, on the other hand a subject, that is far away (for the respective focal length), and small in your frame, will cause the DoF to be deeper. And this gets us to how focus distance changes the look of the DoF.
The shape of DoF
There are 3 significant DoF shapes I would like to show. I call them the "fifty-fifty", the "one thirds-two thirds", and the "going to infinity". Although the naming might not be a good hint, the shapes just highlight the distribution of the sharp areas in front, and behind the focal plane. Let's start with "going to infinity", and work our way closer towards "fifty-fifty".
"Going to infinity"
For every focal length and aperture setting there is a hyperfocal distance. If you don't know what that is, it is the closest distance at which the lens can be focused while keeping objects at infinity acceptably sharp (for a certain display size, and viewing distance).
As an example, the hyperfocal distance for a 24mm lens at f/8 (Mantra! CoC= 0.018mm) is 4.02 meters (13.18 ft). For a 500mm lens at f/8 (Mantra!) is 1736.61 meters (5,697 ft).
As you can see the longer the focal length, the farther away the hyperfocal distance will be. You can feed any focal length with any aperture combination into the calculator, and you will get a hyperfocal distance. If you focus exactly at that distance, you can maximize your DoF (for a certain display size, and viewing distance). You will have noticed that for telephoto lenses focusing at the hyperfocal distance will be unfeasible and useless, as even with the maximum achievable DoF the near limit will be at 868.31 meters, or a bit more than half a mile away (for the above 500mm lens example). It is landscape photographers with their wide angle lenses who will try to harness the goodies of focusing at hyperfocal, and not having to worry about stacking, and movement, and all the negatives that comes with it.
Click this Link to get to the Dof Sim site with the settings for a 50mm lens at f/4 (or take a look at the image below). Please notice that focused at hyperfocal distance the DoF behind the subject goes to infinity, hence the name of this shape.

The meaning of the data here is, that if you are taking a landscape photo at 50mm at f/4 focusing at the hyperfocal distance, the closest acceptably sharp part of your image will start at 10.77 meters (DoF near limit) and it will go to infinity. Of course stopping down will get the hyperfocal distance closer together with the DoF near limit to get you something like THIS (see below image), with DoF starting from 3.91 meters (12.82 ft).

Why don't all decent landscape photographers just focus at the hyperfocal distance and are done with it? You should not forget about the practical difficulties. The first one being that if you miss the hyperfocal distance just by an inch and focus closer, your DoF instead of "going to infinity" will only last a few hundred meters behind your focal plane. Measuring this accurately while balancing on a cliff edge is simply not realistic. The other part of it we already mentioned, the DoF will be only for a certain display size and viewing distance, so cropping in post or printing bigger is out of the question.
So where do YOU sensible, and future proofing landscape photographer focus at?
The good news is, that maximizing your DoF is easy without having to measure the hyperfocal distance accurately in the field. If you play around with the Photopills DoF calculator at 24mm focal length with f/11 aperture setting, your hyperfocal is 2.85 meters (Mantra! CoC=0.018mm), which gives you a DoF near limit of 1.43 meters and the DoF going to infinity. Focusing behind the hyperfocal distance will start to push the near limit further back too, but you will reach a focus distance where the near limit stops moving away from you. For this specific example that will be at 590 meters (645 yd) with the DoF near limit at 2.82 meters (9.25 ft). So you lost 1.39 meters of near limit, but you could be focusing on a mountain top literally a mile away (1609 meters) and get the same DoF near limit. And if you do not have anything closer in your frame that needs to be acceptably sharp (Mantra!), you are set.
Click the image to see the full table

One trick for those who still want to try focusing at hyperfocal distance is, that for any focal length smaller than 27mm (on full frame), at f/11 aperture, and focused at infinity the DoF near limit is only 2cm (0.79 in) closer, than the hyperfocal distance itself. (see image below, and the one above)

You need to set up your composition on your tripod, make all your exposure settings, set focus to manual, focus at infinity, take the camera off the tripod, and while holding it near the ground in a fairly level area you will see on the back screen what is the closest thing appearing to be acceptably sharp. (Take an image and review at 100%, if you have to) Then focus manually a few inches farther away than your closest sharp object, and your focus should be just slightly behind the hyperfocal distance. Set your camera back on the tripod without bumping the focus, and take your picture. Just never forget your mantra! Print size and viewing distance are fairly small here, and printing bigger will show the not so sharp areas. The good news is, the trick works for bigger prints too, double your print size, and the distances double too, but the difference between DoF near limit, and the hyperfocal distance is still only 2 cm (0.79 in).
For those who want to be able to crop in post, or print bigger than planned, the only option is to focus stack. The good news here is, that the second shape on our list will make this fairly easy, and I will show why just taking 2 images instead of many will suffice for a deep DoF in most cases.
"One Thirds - Two Thirds"
For any focal length and aperture setting, if you start focusing closer than the hyperfocal distance the amount of DoF in front of the focal plane, and behind starts with a ratio of 1% in front and 99% behind. The closer you focus towards your camera this starts moving towards the famous 33.3% in front and 66.7% behind. (see below animation)

In our above example the street photographer is using his 50mm lens at f/4, focuses at 7.2 meters and gets everything in acceptable focus from 5 to 11 meters, which could be a nice street photography type distance. I cannot be sure, but my guess is, that this is where the old rule of thumb comes from: "focus one thirds into the frame if you do not have a clear subject to focus at, and you will get everything in sharp focus". If your street is the right size. Stopping down will of course make the DoF deeper, for bigger streets.
For us this is useful because the DoF shapes we get when focusing on our distant mountain (going to infinity), and "one thirds- two thirds" we get when focusing close at our foreground will perfectly match up for our focus stack.(In DoF Simulator the farthest away is 25m, but you get the gist)
The combined DoF of a close focus 1/3-2/3, and focusing at a distant object

Combining the 1/3-2/3, and infinity focus DoFs will in most cases get you a deep enough acceptably sharp area (Mantra!) for landscape photography with a foreground element. But focusing too close will cause another problem to pop up. Which gets us to the last shape, the "fifty-fifty".
"Fifty-Fifty"
If you carry on with focusing closer, not only will the DoF go incredibly shallow, but the amount of DoF in front and behind the focal plane will become equal, hence "fifty-fifty". This is the bane of both macro and landscape photographers. For the landscapers, focusing too close might cause the focus stack to not create a perfect overlay, causing a blurry area in the picture. For macro photographers this will be the cause of the backside of a bug not being sharp when focusing on the head, and instead the area in front of it being in focus.

Take your picture already! I won't hold this smile forever!
Portrait and wildlife photographers on the other hand live for this shape. This is the one that gives them beautiful smooth backgrounds, and foregrounds. It is the same effect, that helped create the 20,000USD songbird image from the beginning of this article. In that one the bird is facing us, focus is on its eye, 50% of DoF is in the air in front of it, causing the tail feathers to completely fall off (just like the bug in the macro image above). In the second image below the same bird is facing away, focus is still on the eye, causing 50% of the DoF to be behind it in the air, and the back of the bird towards us to be within the other half of fifty, and therefore be acceptably sharp (Mantra!). Both images were taken with the same settings, both have the same DoF.
Are you looking at my bum?!


Remember the photo of the string of lights showcasing bokeh balls and the ever growing blur? Remove the background as far away as possible from the focal plane with a fifty-fifty DoF, and it will be nothing but shades of color. What you see behind these birds is tall brownish grasses, and a forest of silver birch trees.
Oh and the cliffhanger! Both images were taken with a Nikon Z50 APS-C camera, and the adapted Nikon AF-P 70–300 mm 1:4.5–5.6E ED VR lens at f/7.1 aperture! That setup costs a tenth of the one assumed by my colleague, and gets a full frame equivalency of 450mm focal length, and an effective aperture of f/11 (7.1x1.5=10.65). To get a shallow depth of field you do not need expensive gear, you need to fill the frame. The additional cost of creating the above bird portraits was a feeder, some sunflower seed, and a pop up hide.
The opposite causes all the frustration wildlife and bird photographers have. If your subject is further away from you, your DoF shape starts to change towards the "one thirds-two thirds", which will make separating your subject from the background even harder, as more behind the focal plane will appear sharp, hence more visible and disturbing. Not even buying a 400mm f/2.8 will solve that problem, it is caused by physics!
We would love to hear your comments and suggestions, so don't hesitate to leave us a message in the comments, and subscribe to our newsletter, so you get notified when the next post comes out.
Disclaimer: there is no sponsored content in this post. No monetary exchange took place, all products were procured with my own money. A big thank you again to Michael Bemowski for allowing me to use his site.

Comments